GEOMETRIC ACCENT WALL
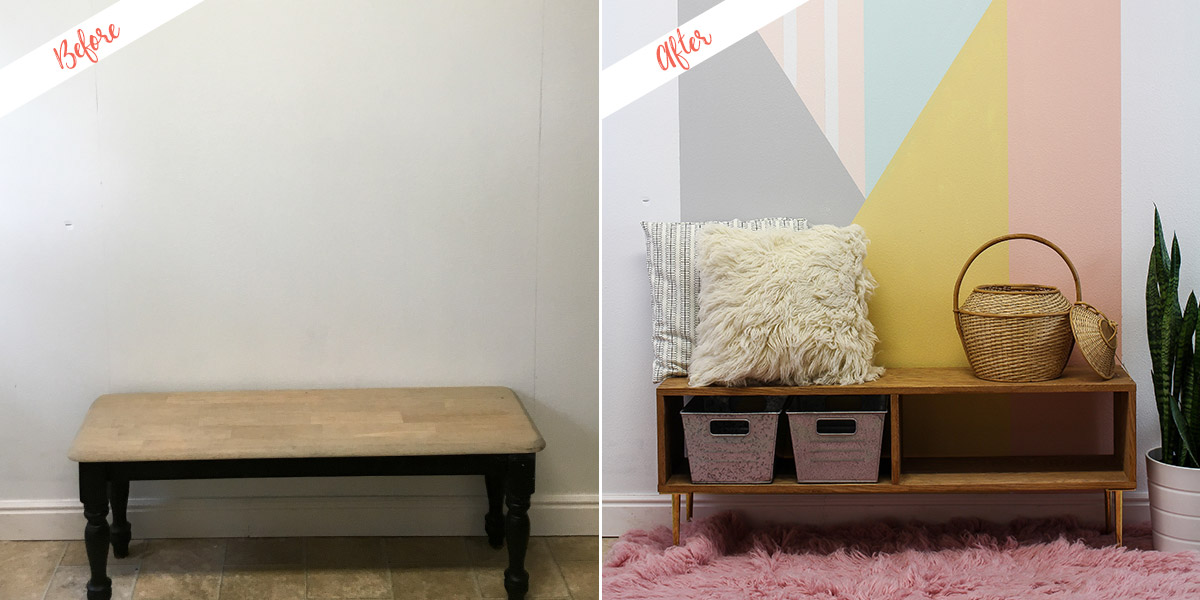
My house is an old 1950’s home. To say it needs updating is an understatement. The side entry has literally been untouched since we moved in, three years ago. I started off by giving the space a fresh coat of white paint, that alone was an amazing update.
I love how much of an impact paint makes. The day after painting the wall white I decided to create a fun focal art piece, right on the wall!
Let me first say that the image might look intimidating but rest assured, painting a geometric wall design is an easy project to complete. Just follow these guidelines and you will have some amazing accent wall art before you know it!
We decided to use a bright paint color palette to add life to our space, but the great thing about this project is you can customize the colors to whatever fits your style best! Check out the Colorfully BEHR Blog to find color inspiration or Behr’s Color Tools to help you find your perfect color!
The fresh new Ultra Pure White® paint is awesome but this colorful accent art is stunning. A little pop of color for is as we enter our home.
This project is very customizable and is so much fun to create. For this space, I ended up going with 4 feet wide and have it extend all the way to the ceiling, which ended up being 90.5 inches. You will want to decide ahead of time what dimensions to use. I also recommend drawing it out on paper to make sure it will work and so you can get a feel for the design.
I would also recommend getting the entire design drawn on the wall before you begin taping and painting.
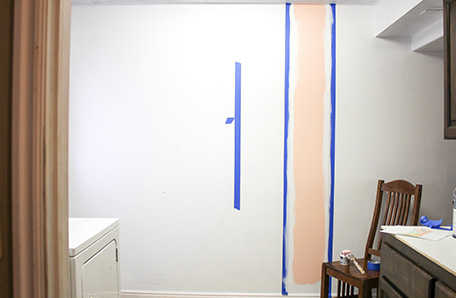
HOW TO MARK THE LINES
To create the geometrical wall pattern, use a measuring tape to mark where each line will go, making tick marks. Then, use a large straight edge and a pencil to connect the dots and draw the lines on the wall.
HOW TO TAPE AND PAINT EACH SECTION
Follow these guidelines as you move from section to section. Following the pencil lines that you previously drew, apply the tape. Press the tape firmly to the wall to ensure good adhesion. Use a paintbrush to apply paint to the edge of the tape with the existing wall color that is under the tape. Some sections will have multiple different colors so be on the lookout. This will ensure that if any paint bleeds, it will be the same color that is below the tape. After applying the existing wall color to the edges of the paint and allowed to dry, finish by painting the real color you want.
Remove the tape promptly after you have finished painting each section. Wait for the paint to dry before moving to the next section.
Don't underestimate the power of paint. Instead of purchasing new, try to freshen up your furniture or walls with a new paint color. I promise it will make a difference.
Once you are ready to move from section to section, you will be painting right next to other colors. Place the tape directly on the new adjacent paint color. Add the tape on top of the new color and as close as you can to the edge. Remember to bleed the paint.
SECTION 1: EVERBLOOMING M190-2
This is the where all the other sections are based off of. Starting on the right, use the tape measure to mark off 12 inches. Use the level and pencil to make two straight lines going up to the ceiling. Follow the taping and painting directions above.
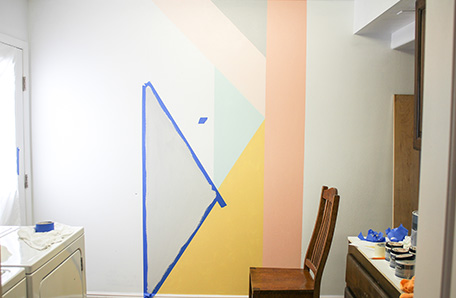
SECTION 2: SILVER BULLET N520-2
Starting at the top of the pink stripe measure over 18” and make a tick mark. Do the same, measuring down 18”. Use the level and a pencil to connect the dots. For section 2, you will be painting white on two sides and pink on one side. Then follow up with the grey once those colors are dry. Follow the taping and painting directions above.
SECTION 3: ISLAND HOPPING M180-1
Make a few tick marks that denote where the 13 inch measurement is. Again, use the level and pencil to draw a line to connect the dots. Follow the taping and painting directions above.
SECTION 4: LUNCH BOX M260-4
Starting from the large pink stripe measure over 15.5 inches and make a tick mark. Then, measure up 32 inches from the bottom, make a tick mark. Mark where those two dots cross. This will be your reference point to make the straight line. Make the straight line using the level and pencil. Follow the taping and painting directions above.
SECTION 7: ISLAND HOPPING M180-1
Add tape to the edge of the wall on the far left side. Add 1.5 wide painters tape every 3 7/8 inches. Follow the taping and painting directions above.
THE BIG REVEAL

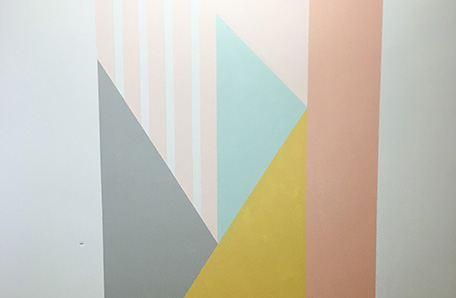
Ta-Dah! All Done!
This project is not hard, especially if you take a little extra care to measure good and bleed the paint. This geometric wall pattern is a breeze to create and I am so excited for you to create your own accent wall art!
The fresh new white paint is awesome, but this fun new accent art is stunning. Isn’t it pretty! A little pop of color for as we enter our home.
READY TO DIY?
Find your color, pick your paint, and be inspired.
When you're ready, buy your paint online.
- Explore colors on your own or browse through our curated collections.
- Click on "Buy Samples or Gallons” and then customize your options.
- Checkout at homedepot.com